Love, love, love glass noodles … and love this recipe too!
When I saw this recipe made during my cooking class in Chiang Mai, they actually made it with seafood. However, the recipe I’m going to provide as of right now refers to using chicken. See the notes section for info on the different types of seafood you can add (pretty much anything!). Either way, it tastes awesome! Spicy, refreshing, light … soooo good.
Yum Woon Sen - Spicy Glass Noodle Salad
Servings: 2
Difficulty: easy!
Ingredients
50g (2 ounces) glass noodles (see notes)
50g (2 ounces) chicken, minced (seafood or tofu work to0 – see notes)
20g (1 ounce) ear mushrooms (see notes)
10g (1/2 ounce) carrots, sliced
30g (1 ounce) tomato, cut in large wedges
30g (1 ounce) onion, sliced
10g (1/2 ounce) coriander and spring onions, chopped small
Dressing
1-3 green chillies, chopped small
1/2 – 1 tsp white sugar
1 – 1.5 TBSP lemon juice
.5 – 1 TBSP fish sauce (or soy sauce)
1/4 cup chicken stock
Notes
Glass Noodles: You can find these in any Asian market, and potentially normal grocery stores as well. The Thai word for these noodles is “woon-sen”.
Chicken: You can use pretty much any protein for this dish. Chicken works well but so does tofu, shrimp, squid, octapus, and whatever else you can find. When I saw this made it was a combination of shrimp and squid. Just make sure you don’t overcook or they will get rubbery!
Mushrooms: As with all recipes, you can use whatever mushrooms you want, but the taste and texture that goes well with this recipe is ear mushrooms (very thin, dark color, large … look like elephant ears, hence the name!)
Method
Soak glass noodles in cold water for 5 minutes, cut into 8cm segments.
Boil ear mushrooms until cooked.
Add glass noodles and carrots about 30 seconds, stir well. Remove, and put into cold water for 1 minute.
Boil minced chicken (seafood or tofu) until cooked.
To make the dressing: mix all ingredients well.
Combine glass noodles, spring onion, coriander, tomato, and dressing. Mix together and serve.
My favorite soup in Thailand will forever be tom kha; however, that is followed in a very close second with this recipe, tom yum (hot and sour soup). This soup is broth based and has a very tasty base of flavors. With tons of traditional Thai herbs and spices, some basic every day veggies, and the kick of roasted chili paste at the end, this recipe never lets me down!
Tom Yum - Hot and Sour soup
Servings: 2-4
Difficulty: easy
Ingredients
3 cups vegetable broth
2 stalks lemongrass, 1 inch segments, bruised
5 kaffir lime leaves, torn
3 slices galangal
½ – 1 cup button mushrooms, quartered
6 Thai chili peppers, bruised
1 lime, juiced
1 medium tomato, sliced
½ onion, sliced
4 TBSP fish sauce
2 TBSP prik pao, roasted chili in oil
Cilantro, garnish
Method
In medium saucepan, bring broth to a boil. Once boiling, add lemongrass, lime leaves, galangal, and chilies and boil for 5 minutes.
Add mushrooms, onion, lime juice, and fish sauce and boil for another five minutes.
Add tomatoes and boil 1-2 minutes until soft, then add prik pao.
Season to taste and remove from heat. Serve with cilantro as garnish.
Notes:
Lemon grass: Do not use powdered lemon grass for soups! It will not give you the correct taste. You can use fresh lemon grass or you can use dried, but try to stay away from the powdered. It won’t taste terrible, it just won’t taste that great either.
Chilies: If you are using fresh chilies, you want to bruise them, which means placing the flat end of your knife on top of the chili and pushing down. This will cause the chili to pop and allow some of the juices and seeds to escape, which will add heat to your dish. If you are using dried chilies, you should crush them a little so the insides are open to the broth for the same effect.
Final Thoughts
Eat this. It’s good.
Do not forget the prik pao at the end. That’s what gives it the red oily stuff on the top and that’s what makes this recipe so awesome, at least for me!
Have you tried the Panang curry paste recipe yet? If so, this one is similar (same same except the peanuts!). Red curry paste can be used to make red curry, obviously, but it can also be used in other curries as well … like the gaeng saparot gai recipe I have posted. Delish!
Nam Prik Gaeng Ped - Red Curry Paste
Servings: varies
Difficulty: intermediate
Note: You can either use a mini-processor to make this paste which makes the recipe so much easier or you can use a mortar and pestle like they do in Thailand. If you choose the latter option, be prepared to spend a good amount of time pounding the paste to get the right consistency. It’s a great final product but it definitely takes time!
Ingredients
7 large guajillo dried chillies
2 TBSP garlic, chopped
2 TBSP shallots, chopped
1 TBSP fresh lemongrass, chopped (see notes)
1 tsp galangal, chopped
1 tsp coriander root, chopped (see notes)
1/2 tsp Kaffir lime peel (see notes)
1/2 tsp peppercorns, roasted (see notes)
1 tsp coriander seeds, roasted (see notes)
1/2 tsp cumin seeds, roasted (see notes)
1/2 tsp salt
1/2 tsp shrimp paste
Notes: Here are some notes on the above ingredients.
Lemongrass: For this recipe you can use either fresh lemongrass, dried, or powdered lemongrass. Powdered is easier to find and works well in pastes.
Coriander Root: This is exactly what it sounds like. You are not using the leaves; you are using the root. Some coriander in the market may already have the root removed. Try the organic section. You should be able to find it somewhere!
Kaffir Lime Peel: This is like the zest off a lemon or lime, but specifically from the Kaffir lime. These limes are not grown in the US and are nearly impossible to find in stores (I have yet to find them). You can order them from ImportFood or you can find a powdered or dried version.
Roasted Peppercorns, Coriander Seeds, Peanuts: For any of the roasted items you can either roast them yourselves or attempt to find the products pre-roasted. I would recommend roasting them yourself (placing in a pan on low/medium heat and browning) so that you can use the rest of your stock of the product in other recipes that may not call for roasted.
Method with Mini-Processor
Place dried chilies in a bowl of hot water and let soak for 15 minutes.
Place chilies and remaining ingredients into mini-processor and blend until paste is formed. Add a tablespoon of water if paste is too dry.
Method with Mortar and Pestle
Place dried chilies in a bowl of hot water and let soak for 15 minutes. Remove from water and set aside.
Put peppercorns, coriander seeds, and cumin seeds into a mortar and pound well.
Add the remaining ingredients except shrimp paste. Pound until mixed well.
Add shrimp paste. Pound until fine and smooth.
Note: Take your time! This is not going to be done in five minutes. It’ll probably take more like 15-20 minutes or potentially longer. Put some muscle into it!
Notes:
Curry pastes can last up to a few months if kept in a Tupperware container in the refrigerator.
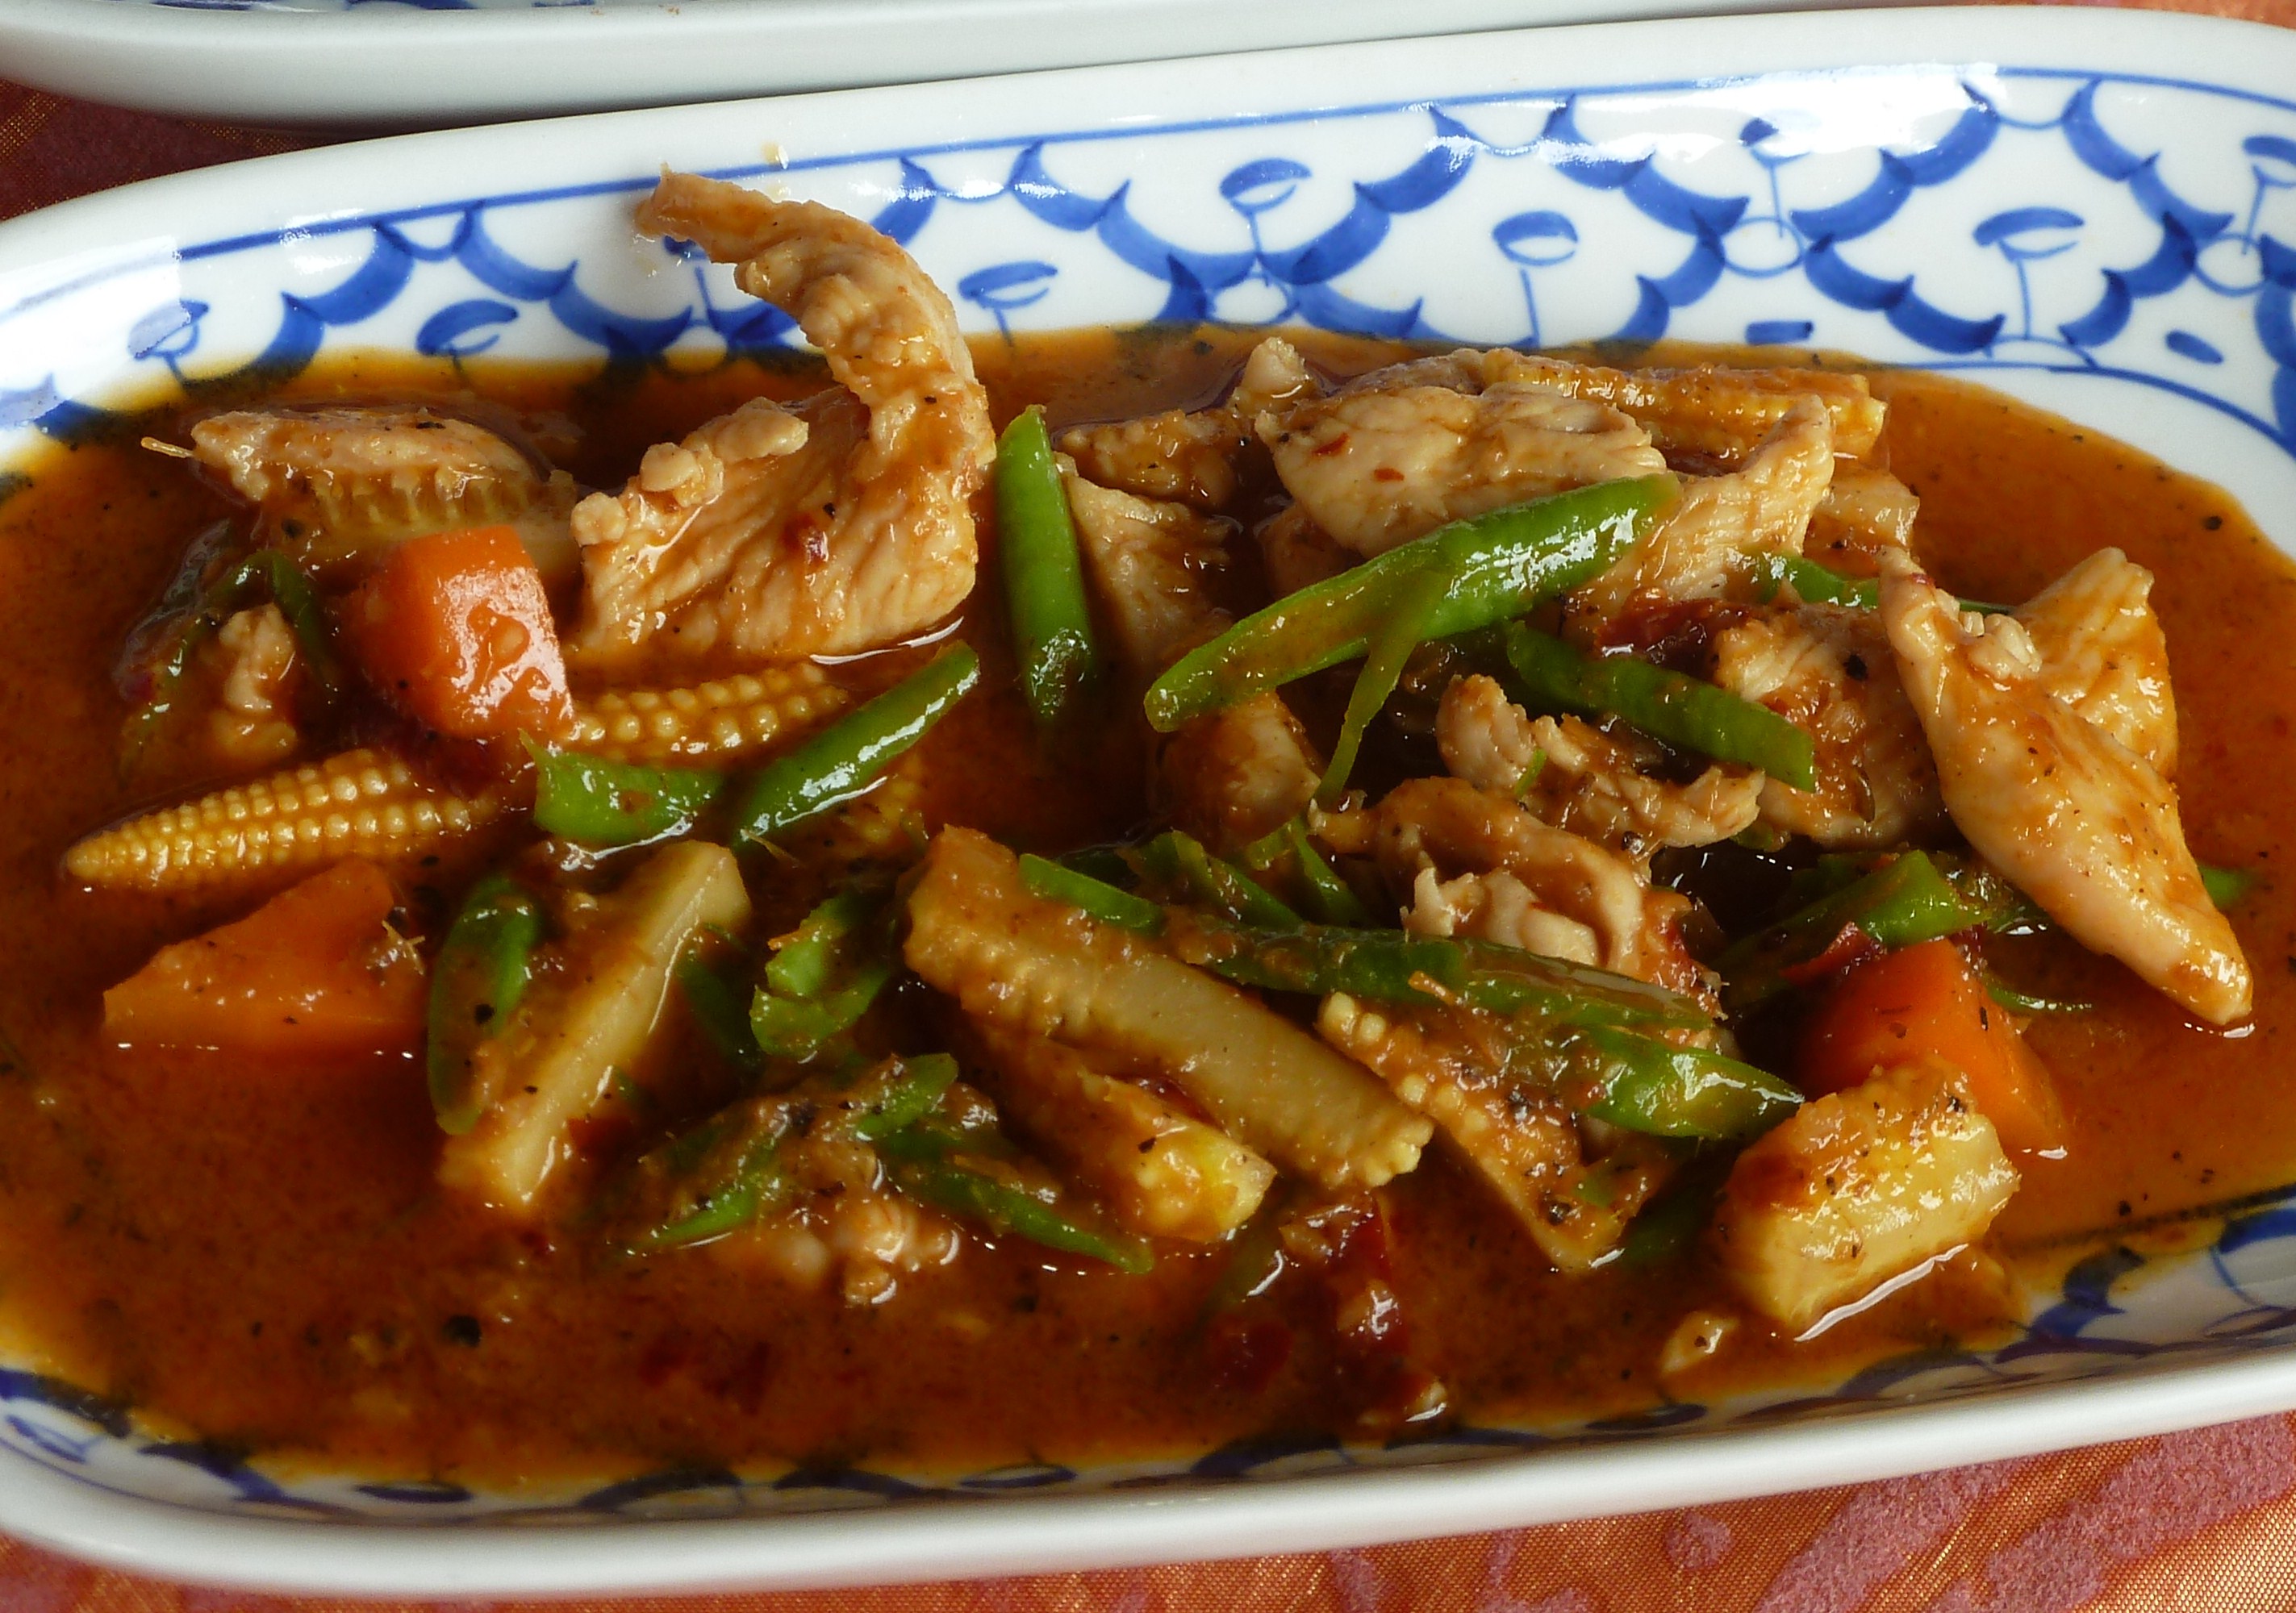
Panang Curry is my all-time favorite curry. Before heading to Thailand for my Peace Corps service, this was pretty much the only dish that I would order from the Thai restaurants back home … well, that and Pad Thai. The flavor was always fantastic no matter what restaurant I tried. It never let me down. So, if you’re up for a warm and savory curry known more for its depth in flavors than for it’s spice (though you can make it spicy if you want!) definitely check this out!
Gaeng Panang Gai - Panang Curry with Chicken
Servings: 2
Difficulty: intermediate
Ingredients
Panang Gai
2 cups coconut milk, or more
4-6 TBSP paste, or to taste (commercially purchased pasted works well too – I recommend Thai and True)
1 TBSP shredded kaffir lime leaves
½ tsp palm sugar
2 cups chicken, sliced
2 TBSP fish sauce
¼ cup Thai basil leaves
½ cup coconut cream
Method
Heat pan/wok on medium-high heat, then add ½ cup of coconut milk. It should sizzle right away and start to boil; add paste and mix well.
Fry the paste in the pan. Keep adding a bit of coconut milk every minute or two so as not to let it get too dry. Keep stirring so it doesn’t burn. Cook for 4-5 minutes in this fashion. You should see a lot of oil coming to the top of the curry. This is normal and shows you’re doing it right!
When oil is rising and bubbling, add meat. Heat until chicken is cooked through, then add lime leaves, fish sauce and palm sugar. Keep cooking 3-5 minutes. Add additional coconut milk if dish ever gets too dry.
When finished, remove from heat and add basil. Stir until mixed well and basil has wilted slightly. Serve topped with a spoonful of coconut cream and some sliced kaffir leaves.
Notes:
Kaffir Lime Leaves: You will not want to use a powder or dried leaves for this. If you cannot find fresh, just omit.
Palm Sugar: Best option is palm sugar but if you can’t find it you can use a brown sugar (next best) or a white sugar (also good).
Final Thoughts
You can add any vegetables you want – baby corn, carrots, tomatoes, bamboo shoots, whatever you think would taste good!
One of the best things about Thai food (in my opinion) is the connection you get with your food. I think it’s like that with most cuisine. When you take the time to prep the ingredients, put them all together, and come out with a fantastic final product, you get this awesome feeling of accomplishment and the food just seems to taste better.
So, when making any Thai curry, you have to ask yourself a question. Should I make the paste by hand, use a mini-processor, or should I buy one that’s already pre-made? The answer to that is completely up to you. I think it’s fun to make the paste on your own! It takes time, but you can tweak it so the final flavor is exactly what you want it to be.
However, it does take a bit of time, and the pastes you can buy at the Asian market are going to be just as good … you just aren’t cooking completely from scratch, and if that’s okay with you, then go for it! But, for those of you who want to try your hand at making curry from start to finish completely on your own, here is the recipe for Panang Curry Paste. Also check out the recipes for Red Curry Paste and Green Curry Paste … also delish!
1 1/2 tsp ground coriander (if using seeds, pound into powder prior to putting in processor)
1 tsp salt
1/2 tsp ground cumin (if using seeds, pound into powder prior to putting in processor)
1/2 tsp ground black pepper (if using peppercorns, pound into powder prior to putting in processor)
1 tsp shrimp paste
Notes: Here are some notes on the above ingredients.
Lemongrass: For this recipe you can use either fresh lemongrass or powdered lemongrass. Powdered is easier to find and works well in pastes.
Kaffir Lime Leaves: Very few Asian markets that I have found in the area actually these leaves. I purchase mine from Uwajimaya in Bellevue or Seattle. I haven’t had much luck in other places. You can also find powdered kaffir leaves in some places as well.
Method for Mini-Processor
Place dried chilies in a medium bowl; cover with hot water and soak for 15 minutes. Drain; place chilies and all remaining ingredients in a mini-processor. Process until paste forms.
Method for Mortar and Pestle
Place dried chilies in a medium bowl; cover with hot water and soak for 15 minutes. Drain and set aside.
Put coriander, cumin, salt and pepper into mortar and pound well.
Add lemongrass and kaffir leaves and pound well.
Add the remaining ingredients except shrimp paste. Pound until mixed well.
Add shrimp paste. Pound until fine and smooth.
Take your time! This is not going to be done in five minutes. It’ll probably take more like 15-20 minutes and maybe even longer.
Notes:
Curry pastes can last up to a few months if kept in a Tupperware container in the refrigerator.
Khao soi made with Lobo brand Kao Soi seasoning and seasoned with Thai and True Hot Chili Oil
Earlier this week I posted this quick pic of a bowl of khao soi, a delicious curry and egg noodle dish coming out of the Chiang Mai area of Thailand. After visiting the region, this dish quickly become one of Cory and my favorite dishes and we often make it at home. Unfortunately, khao soi (as with many Thai dishes) takes a lot of preparation and we don’t always feel like putting in the effort. It’s on these nights that we sometimes decide to use prepackaged ingredients.
I won’t lie, when we choose to go that route we are often sorely disappointed. No matter how “authentic” these types of products claim to be, they rarely meet that standard and typically lack a vital flavor, spice, or ingredient. Huge bummer.
This time around though we were extremely pleased by our final product! We used two new products that I can honestly say will become a regular star player in our kitchen.
Kao Soi seasoning mix found at ImportFood.com
Lobo brand Kao Soi Seasoning
As I said, khao soi is one of our favorite dishes and I have a pretty great recipe to make this from scratch. Unfortunately, while it’s a fairly simple dish to ‘get right’ it does take quite a few ingredients and a lot of time to prepare. That’s why I was so thrilled to find a product that takes out the preparation time and still makes a delicious final product.
All we had to do was add the seasoning packet to a can of coconut milk, add chicken and let it simmer, and then tweak at the end with lime juice and fish sauce to get our preferred flavors.
And the end result? Fantastic!
This seasoning created exactly what we love most about khao soi – a mouthwatering bowl of Thai-style comfort food. This seasoning has that perfect mix of curry flavors including a hint of cardamom that you usually find in Massaman curry and adds a new depth to the flavor. When mixed with a little lime, cilantro, and fish sauce you have that ideal combination of sour, sweet, salty, and spicy that every authentic Thai dish contains.
The only thing lacking was that bit of extra heat Cory and I love in all our Thai dishes. That’s not to say there isn’t a good bit of heat to this product, but Cory and I like things spicy!! So, that brings us to the second ingredient up for review.
Availability
We purchased this product from our favorite Thai product website, ImportFood.com, though you may be able to find this product in other local Asian markets. We haven’t looked yet but I’ll update if/when we find it!
Thai and True Hot Chili Oil found at Whole Foods
Thai and True Hot Chili Oil
Oh my goodness … what an amazing product this is!
I first discovered Thai and True on a visit to Whole Foods. They had a string of Thai and True products on their shelves and while I didn’t purchase any of them, I did read the back of the jar and learn a little bit about the Thai and True company.
Talk about awesome! Thai and True is a company based in Oregon that hand-makes a wide variety of GMO-free, gluten-free, and Vegan products. They are stocked in various stores around Oregon and Washington and work hard to retain that ‘local’ company feel.
I recently made a trip back to Whole Foods and decided to purchase two of their products including Hot Chili Oil. Hot Chili Oil is often used as an add-on sauce found on tables at Thai restaurants (similar to how we serve ketchup). This particular product is a combination of rice bran oil, Thai chilies, vinegar, fried garlic, and sea salt – a very simple combination that packs a big punch!
While it is described as an oil, it’s actually more of an oily paste of ground up chilies and garlic. With a very well-rounded base of flavors, this chili oil can be added to nearly any Thai dish (or non-Thai dish) to up the spice level. One teaspoon of this product bumped our entire batch of khao soi from a “one star” dish to a “two star” dish. I have a feeling we’ll have this single jar of oil for quite some time!
We look forward to trying this product in many of our other favorite Thai dishes and will make this product a staple in our kitchen going forward.
Availability
Thai and True is only sold in select stores across Oregon and Washington though you can order the products directly from their website as well.
Earlier this month I vacationed in Hawaii for two weeks. It was a wonderful trip overall (who wouldn’t enjoy two weeks of relaxation?) but one of my favorite parts of the trip was traveling to the local grocery store for produce and seeing an array of fruit I haven’t seen (at least in fresh form) since living in Thailand.
If you were to ask him, Cory would gladly regale you with the story of his first pad ga prao (stir-fried Holy basil) experience. We were at Victory Monument in Bangkok awaiting a van to Kanchanaburi, my home during my stay in Thailand. We had a few minutes to kill and Cory was starving so we sat ourselves down at a tiny metal table outside a ran ahaan (restaurant) on the corner. They had a large pan (similar to those you use in catering) filled with piping hot pad ga prao moo (stir-fried pork and Holy basil). Cory ordered a plate along with a fried egg and began to chow down. He wasn’t more than a few bites in when he looked at me – an expression of delight and pain mixed into one.
The dish was spicy … really really spicy. He made his way through the dish and finished every bite, but it took quite a bit of effort, sweat, and perhaps even a few tears. But, to this day Cory still says it’s one of the best plates of Thai food he’s ever had.
In the years since then and the multitude of Thai restaurants we’ve tried we have never once come across a plate of pad ga prao that delicious, and not for lack of trying. This particular dish is one of our favorites and I’m not exaggerating when I say we’ve ordered it at probably 90% of the Thai restaurants we’ve visited. I will say there are some good dishes out there, but none come even close to that one single plate of food … and I know exactly why.
The basil.
You see, in Thai cooking they use multiple different kinds of basil depending on the particular taste they are trying to achieve. They are all delicious in their own right but each provides a unique taste that makes certain dishes distinctly individual. Pad ga prao is one of those dishes. Traditionally, as stated in the name, this dish is made with baiga prao, or Thai Holy basil, as opposed to bai horapha (Thai sweet basil) or bai maeng-lak (lemon basil). When you trade out one basil for another, you change (often drastically) the taste of a particular dish and that is exactly what we constantly experience in Thai restaurants locally.
Thai Holy basil, the traditional star ingredient in pad ga prao is incredibly difficult to find in the states. It requires a specific growing environment and is a very fragile plant that doesn’t travel well. So, the majority of Thai restaurants choose to substitute the Holy basil with the more widely available Thai sweet basil. Why they still call it pad ga prao I will never know, but I digress.
The point is that the type of basil you use in Thai cooking is important! You technically can use whatever you’d like, but don’t expect to get that same awesome authentic taste you’ll find in a traditional and properly made Thai dish.
To help you out a bit, here is a brief description of each of the three main types of basil used in Thailand along with a tidbit on the traditional basil used in Italian cooking. If you can take the time to find the appropriate basil called for in your recipe, you’ll be a much happier camper.
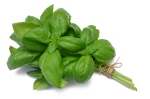
Thai basil – bai horaphaโหระพา
Thai Holy basil is used in many types of dishes including curries, soups, stir-fries, and salads. So delicious!
Thai ‘sweet’ basil grows from a purplish stem and sprouts spear-like leaves with a slightly jagged edge. This basil has a distinct scent similar to that of anise or licorice and is sometimes referred to as anise basil for that reason. This basil is the most widely used in Thai cooking and can be found in curries, soups, stir-fries, and salads. This basil is also sweet enough that it can be eaten raw as well as cooked within dishes.
You can find this basil at nearly all Asian markets as well as some grocery stores with a decent ethnic food section and it usually isn’t too expensive either. Locally, my favorite places to buy this basil is JD’s Market in Lynnwood (super inexpensive) and Uwajimaya in Bellevue (great quality, very fresh!). I’ve also found that it keeps the longest of all the basil types that I’ve tried.
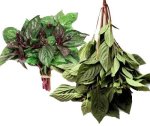
Thai Holy basil – bai gka-prow – กะเพรา
Holy basil is used mostly in stir-fried dishes and has a very spicy or peppery taste. Very difficult to find in the Pacific Northwest!
Thai Holy basil is very different from the sweet basil both in look and in taste. Holy basil, also called hot basil has a reddish purple tone around the stem and base of the leaves. The leaves are also jagged but are smaller and more fragile and slightly fuzzy to the touch. This basil gives off a scent similar to cloves and has a very peppery taste. It adds a spiciness to dishes (hence being called hot basil) and is best if eaten cooked rather than raw. This basil is mostly used in stir-fried dishes.
Holy basil is very difficult to find locally. You can easily find seeds to grow your own but quality seeds are also hard to come by and the weather/temperatures in the Pacific Northwest make it difficult. You can order Holy basil plants from a few websites but they only ship during ‘on’ seasons which are approximately April to July and again October through December.
Lemon Basil – bai maeng-lak – แมงลัก
Lemon basil is used in some very specific Thai dishes including khanom chin nam ya.
Unlike Thai sweet basil and Holy basil which can be interchanged without completely ruining a dish, lemon basil has a very distinct lemon/lime taste and there isn’t much alternative. This basil has pale green leaves that are a bit less jagged than the previous two with a hairy/fuzzy feel. This basil is used in many dishes as well as being served as a garnish in some very specific Thai dishes including khanom chin nam ya.
Lemon basil is also very hard to find locally but is much easier to grow and keep alive than Holy basil. It’s worth a shot to try this one in your herb garden or greenhouse! You can buy seeds at some local Asian markets like Uwajimaya (they have a stand near one of the doors). You can also order them off line at Amazon or some online gardening sites.
Sweet Basil
Sweet basil is used mainly in Italian cooking and should not be subbed into Thai cuisine if you want an authentic taste.
Not to be confused with Thai Sweet basil, this basil is the one commonly used in Italian cooking. These leaves are oval shaped and the stemmed look square. The leaves also often have a shiny quality to them. This basil tastes sweet and slightly peppery and are often combined with tomatoes or other vegetables to enhance flavor. The leaves are often eaten raw or mixed in at the very end of dishes so they are served slightly wilted.
Sweet basil can be found in nearly every grocery store … anywhere.
*Note* Due to the fact that I cannot find some of these basils I had to search for some quality photos to use. Please click on the photo to be directed to the original source which may also provide some interesting information about these basils that I didn’t include in my entry.
I’ve been meaning to write on this particular topic for quite some time. Pretty much every time I walk into a Thai restaurant and see chopsticks on the table I groan and think two things to myself:
I should probably leave.
I really need to address this issue in my next blog entry.
It’s taken me until now to write about it which means many of you have been going along in your day-to-day visits to Thai restaurants (because come on, we all go to Thai restaurants daily, right?) believing that Thais use chopsticks to eat their food. For that I apologize!
The truth is that Thais do not use chopsticks.
Crazy, right? I’m sorry if I just blew your mind.
In truth, Thais have adopted a more Western method of eating food. History goes that King Rama IV brought the fork and spoon to Thailand back in the 19th century. Thailand had yet to be colonized by European powers (like all surrounding countries) and he believed that bringing some Westernization to Thailand might help further evade that seemingly inevitable fate. He brought in advisors to teach the Thai Royal Court western culture including the use of the fork and spoon. Since then the use of the fork and spoon have become common place.
Phad Thai is commonly eaten with a fork and spoon.
The use of these utensils is still somewhat unique though. In Thailand the fork is used to push food up onto the spoon which is then the item used to bring the food to your mouth. No knives are used; rather, the edge of the spoon acts as the knife when necessary.
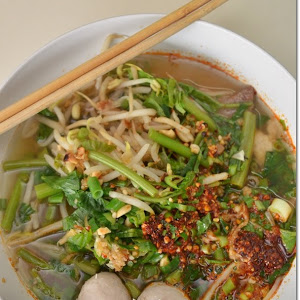
Now don’t get me wrong – there are chopsticks in Thailand. They are mostly used when eating noodle dishes, many of which were brought to Thailand by other Asian countries. For example, the only dish that I actually used chopsticks for was kway tiao, a noodle soup dish commonly purchased from street vendors. That being said, not all noodle dishes are consumed with chopsticks. You will still find many Thai people using the traditional spoon and fork for Phad Thai, Phad See Ew, and other dry noodle dishes.
Kway tiao nam tok is a dish in Thailand often eaten with chopsticks.
So then why do the majority of Thai restaurants here in the states have chopsticks on the table? I really can’t answer that question for sure but my guess would be Americanization and the belief by Americans that Asian countries use chopsticks. To us, an Asian restaurant is ‘authentic’ if we can eat with chopsticks, which I don’t quite understand either because eating with chopsticks is hard. That’s a whole different entry though.
And there you have it, the reason I groan every time I walk into a Thai restaurant with chopsticks already on the table. Is that restaurant truly authentic or just trying to make me think they are?
Sorry for the delay everyone! I’ve been super busy with a new job, a new apartment, and a new little niece! I haven’t had much time to update the blog, but I’m getting back to it … and starting with one of my favorite dishes ever … som tum!! Enjoy!
Som Tum (Green Papaya Salad)
I must say, my absolute favorite Thai dish is som tum. A salad made with fresh green papaya, som tum is spicy, sweet and refreshing all at the same time. I do love me some curry and dozens of other awesome dishes, but if I had to choose one single Thai dish to eat for the rest of my life, this would be it.
I apologize for not getting this recipe up sooner! I should have done it in Thailand but didn’t get around to it. Then, after returning to Seattle, I have struggled to find fresh green papaya! It’s definitely a rarity in this area. Most papaya you find is the fruit in its traditional form. Finding a market that carries this type of papaya has taken nearly a year, but I finally found one! So, here you are with a simple but awesome recipe for som tum.
This particular recipe is for som tumThai, which includes peanuts. You can always keep those out if you want, but personally, I think it makes the dish!
Note: If you are going to use a mortar and pestle, make sure that it is clay or wood. A stone mortar and pestle will bruise the ingredients too much. You want a surface that will give. If you do not have a mortar and pestle, you can just use a large bowl and crush with a spoon.
Som Tum Thai - Green Papaya Salad
Servings: 2
Difficulty: intermediate
Ingredients
2 cups green papaya shredded
3 Roma tomatoes, quartered
8 or so string beans, cut into 1inch pieces
3-4 garlic cloves, chopped
4-6 Thai chilies, sliced in half
2 TBSP fish sauce
2 TBSP palm sugar (can substitute white or brown sugar)
2 TBSP fresh lime juice
¼ cup peanuts
Method
Mix fish sauce and lime juice together in the bottom of the bowl.
Add sugar and mix until partially dissolved.
Add chilies, garlic, string beans, and tomatoes and bruise with pestle (or spoon). To bruise is to crush slightly so they keep their form but are slightly falling apart.
Add shredded papaya and bruise while mixing with spoon. Make sure sauce is coating the papaya.
Add peanuts and mix.
Serve and enjoy!
Notes
Taste your sauce before you add the vegetables. If you want the sauce sweeter, add more palm sugar. If you want more salt, add fish sauce. If you want spicier, add more chilies. It is easier to do this prior to the vegetables being added than after!