I know it has been awhile since my last post … and by “awhile” I mean about six months, which is absolutely ridiculous and uncalled for. My apologies. My life has gone through a lot of changes in the last six months that has kept me from continuing this blog. However, things are settling down and I’m ready to give you a few updates on where I went, what I’ve been doing, and what’s going to happen withKy Cooks Thai. Are you ready? Here we go.
This blog started when I was a Peace Corps Volunteer in Thailand. I was living in a small village, becoming a part of the Thai culture, and learning how to cook while I was at it. It was a perfect opportunity to start a blog about Thai cooking. I mean, I had access to an actual Thai market, real Thai ingredients and equipment, and actual Thai community members who could show me the ropes. It was awesome!
Unfortunately, back in September I decided to end my term as a Peace Corps Volunteer and return to the states. The reasons for that don’t really matter. What does matter though, is that it obviously became impossible for me to continue Ky Cooks Thai with the goals and objectives it started with – an American girl in a Thai kitchen. I spent the first month or so that I was home just settling back in and didn’t think twice about the blog. Then, as things began to fall into place back home, I did start thinking about the blog and was completely overwhelmed. What was I going to do with it? How could I continue the whole Thai cooking thing from a normal American kitchen? How could I find a new hook that would keep people interested? I thought and I thought and I thought … and I came up with nothing.
So, the blog has been here … just sitting … waiting for me to figure out how to jump back in.
Well, today marks a very important day as I think I have found a way to get Ky Cooks Thai back up and running. It obviously won’t be the same as when I was in Thailand, but I have some fun new ideas that hopefully will draw in a new crowd of readers.
The fact is that I have a background now in Thai cooking. I know the basics. I know the best ingredients. I know a few interesting techniques. I may be back in the states, but those things are not going anywhere … so, this blog will now have a “Ky Cooks Thai in the States” feel. There are a number of components that I want to include:
1. My cooking experiences in an American kitchen – why stop putting up recipes, tips, and tricks? I’m still cooking, therefore, I can still post about it!
2. Recipes!
3. Ingredient Help – Asian markets in Seattle and around the country are often difficult to find and to maneuver. Certain stores carry certain things. Some stores have a great variety while others don’t. I will dedicate part of this blog to helping those in the Pacific Northwest find the ingredients they need for proper Thai cooking … and hopefully I’ll be able to expand this outside of Seattle at some point 🙂
4. Restaurant reviews – I am constantly looking for great Thai food restaurants whether it be in Seattle or in other places I travel around the states. As someone who has had my fair share of authentic Thai food, I feel the need to share with others what makes the cut and what doesn’t.
5. Anything else I can come up with down the road! I want this blog to be successful so I am open to any suggestions on other Thai cooking related ideas. I want to bring you what you want to read!
So, sit back and enjoy the new and improved Ky Cooks Thai. I’m hopefully that this new direction will be successful and will satisfy my need to share Thai cooking with the world.
I’m kind of obsessed with cashews. Whenever there is a bowl of mixed nuts in front of me, those are the only nut I eat. When I go to the grocery store and allow myself to splurge on the bulk nut section, always cashews. When I make brownies or cookies that call for walnuts or pecans, I always substitute for, you guessed it, the cashews. Needless to say, this is a recipe I love! Who doesn’t enjoy sweet tender chicken, savory sauce, and the added crunch of the best nut ever?
This was another fairly easy recipe for me to throw together. I was able to snap a few shots, which means it definitely wasn’t overwhelming like the Spring Rolls here! I did forget to add the spring onions at the end (I substituted Chinese chives).
I also would probably have added a bit more seasoning. I’m not good at taste testing before I plate so sometimes I realize it would have been better with a little more fish sauce, a little less sugar, etc, after it’s too late to make any changes. I’m sure I’ll get better at this but this was one of the issues I had with this particular recipe. Specifically, I would have added more fish sauce.
So, if you’re ready for an easy recipe of chicken, tasty vegetables, and the crunchy awesomeness of cashews, gives this one a try! You won’t be disappointed.
30 g (1 ounce) ear mushrooms, think sliced (see notes)
10 g spring onion, cut into 3 cm length
1 bell chili (or red diced chili)
1 TBSP garlic, chopped
1.5 TBSP palm oil (vegetable or canola works too!)
1/2 tsp palm sugar (or white)
1 TBSP oyster sauce (or mushroom sauce)
1/2 TBSP fish cause (or soy sauce)
1/4 cup water
Notes:
Mushrooms: use whatever kind you want but ear mushrooms (big dark flat mushrooms) work well.
Bell Chili: Not sure what this is. I’ll do some research and get back to you!
Vegetables: They say baby corn OR carrots. Why not both?!
Preparation: In my opinion, it is always important to prep and separate all your ingredients prior to cooking since many recipes (this one included) cook very fast and can get easily overwhelming for a beginning cook (like me!).
How to separate ingredients:
Plate One: Garlic and Spring Onions (I used Chinese Chives). These are your first and last ingredients.
Plate Two: Your choice of meat. I used chicken.
Plate Three: This plate is all of your vegetables that are added at the same time. It’s easy just to tip the plate right in!
Tabletop: All of your seasonings should be readily available on your counter.
Method:
Place oil in pan with garlic. Fry until fragrant, stirring frequently. Do not let garlic burn!
Add chicken and stir until cooked.
Add cashew nuts and stir until lightly golden.
Add baby corn, large onions, ear mushrooms, red diced chili, and stir well.
Add water and season with sugar, oyster cause, fish sauce; stir again.
Add spring onion and mix well. Turn off heat.
Notes:
Just from reading this recipe, I might recommend adding the cashew nuts halfway through cooking up the chicken. I feel as though the chicken might get a little over cooked while waiting for the cashews to brown. Just a thought.
Okay, so finally I have an actual cooking story to tell you! I feel like all the rest of the recipes I have tried went off without a hitch and I wasn’t able to give you a fun account of how it all went down … well, fear not my friends! This one was a bit of a doozy.
I’m not saying that to scare you away.
Really, I’m not …
But, this recipe is not the easiest one to accomplish though I think even if you mess up the first few steps, the end result is still pretty good. At least that’s how it was for me!
So the first step of this recipe is to make the inside concoction for the spring rolls. That would consist of garlic, tofu, spring onions, bean sprouts, and glass noodles. There are also a few seasonings thrown in there. You start by cooking up the garlic and oil, then adding the tofu to cook, then seasoning, adding veggies and noodles, a bit of water, and voila! You have your insides …
Things didn’t work that well for me.
I got the first part down … oil and garlic? I’m a pro.
Then I added the tofu, and it just wasn’t cooking right. I waited and waited and waited and it just wasn’t browning like it should. I think my heat wasn’t up high enough … so in the end, by the time my tofu was cooked, I think my garlic was a little crispy. Oh well, such is life.
Then you are supposed to add water and seasonings, also an easy step for most people. Well, remember I just said that I think my heat wasn’t up high enough? Well, toward the end I had turned it up to finish the tofu and didn’t turn it back down. The result? Adding water and causing a large billow of steam and probably oil that, if I wasn’t cooking outside, may have caused some issues in the house. Oops 🙂
I then added the veggies, which was all easy peasy, but they I didn’t quite know how to tell when they were done. Are the sprouts supposed to be really soft? What are the noodles supposed to look like? How do you tell if spring onions are finished? I guessed and took them off the stove after about a minute and a half.
So, step one, Complete!
The next step is to wrap the spring rolls. Oye. You need some skill for this.
Quick note, I cut my spring roll wrappers into quarters to make smaller rolls. This was mainly because the big package didn’t fit in my freezer, but also because this is how it was done in the cooking class. I wanted to follow directions as strictly as possible this first time around!
To wrap the spring rolls, you are supposed to lay a wrapper on the table with a point facing you, place a tablespoon of insides on it, roll over twice, put egg on the three remaining corners, fold the sides in, and finish wrapping. It sounds fairly simple … until you have too much or two little of the insides … or too much of the sauce from cooking the insides so it gets soggy … or not enough egg to make it stick … or so many other things.
Let’s just say, mine were U-G-L-Y.
Then you are supposed to drop them in the oil that you have been heating this whole time. Oops, forgot that until about halfway through, so by the time I finished, my oil still wasn’t hot enough. I’m impatient. I started anyway. I put one in as a tester just to see if it would work. I waited forever for that thing to be done! So much for avoiding a wait.
When that one finished, I took it out and put in all the rest. They all made it successfully into the oil, except the last one which I hurriedly dropped and splashed oil onto my favorite fisherman pants. Grrr. Not a happy camper.
Long story short, they cooked, and voila … spring rolls!
They didn’t look quite as good as they probably could have, but boy did they taste good! Paired with a sweet chili sauce, they are delish!!!
Needless to say, this was a bit of a cooking adventure, but the end result was still quite tasty. I urge you to give it a try!
And, I apologize. Given the craziness of this cooking attempt, I was unable to get pictures during the process. I was too scared of dropping my camera into the oil!
Next time, I promise .
So, here we go with the recipe!
Fried Spring Rolls
Servings: 4 large or 10 small rolls
Difficulty: intermediate
Ingredients:
Po Pia Tod from my Thailand kitchen
30g (1 ounce) glass noodles, soaked and cut into 6cm lengths
30g (1 ounce) tofu, minced
20g (~1 ounce) Chinese chives, cut into 3cm lengths
20g (~1 ounce) bean sprouts
1 TBSP garlic, minced
2 TBSP palm oil (vegetable or canola)
1 TBSP oyster sauce (mushroom sauce)
1/2 TBSP fish sauce (soy sauce)
.5 – 1 tsp palm sugar (white or brown)
2 TBSP water
4 pieces spring roll wrappers (10-12 for small spring rolls)
1 beaten egg
lots of oil (see notes)
Serve with sweet chili sauce
Notes:
Oil: In order to cook the spring rolls, you need a wok full of oil. The amount of oil varies depending on the wok. You want to make sure that when you put the spring rolls in, they do not touch the bottom of the pan. A good rule of thumb is to fill the wok about 3-4 inches deep with oil.
Spring Roll Wrappers: You can find these in the freezer section. I bet most grocery stores have them but Asian markets surely will.
Preparation: As with many other recipes, this one (especially the filling) can move really fast. Make sure you have your ingredients prepped and ready for each step. It helps to separate the ingredients into sections so you can grab and go as needed!
Plate One: Garlic and tofu are the first main step of the process. Put them on a plate together.
Tabletop: Place all your seasonings together so they are easy to find. Sometimes it might be helpful to measure them out and have them ready before hand.
Plate Two: Noodles and vegetables all go in together so they can go on a place together.
Tabletop: Wrappers and a beaten egg. This is what you will need for making the rolls. Don’t prep the wrappers too far in advance because they will dry out! Make the filling first, then pull out the wrappers and set up for this process.
Method:
Making the Filling
Put oil and garlic in a pan, fry garlic until fragrant.
Add minced tofu, stirring until cooked Note: You will know the tofu is cooked when it turns a golden brown or the pieces stick together a little bit.
Add water and season with oyster sauce, fish sauce, and sugar. Mix well. Note: Be sure your heat isn’t too high at this point or the water will steam away immediately!
Add the vegetables and glass noodles. Stir until everything is done, about one minute.
Remove from heat and drain excess liquid. Note: Draining is important! If there is too much liquid in the mixture it could cause the wrappers to get soggy and break prior to putting in the oil.
Prepare the pan with oil and begin heating over medium heat.
Wrapping the Spring Rolls
Prepare 4 pieces of spring roll wrapping or 10-12 for smaller rolls.
Beat one egg and keep off to the side.
Place one spring roll wrapper in front of you with the point facing you.
Place 1 TBSP of the filling onto the wrapper.
Fold the tip closest to you over the filling about two thirds of the way up. Press it down against the top part of the wrapper and pull toward you to secure the filling inside.
Fold filling part of wrapper up towards top once.
Dab the three remaining corners with egg.
Fold in the left and right corners tightly.
Fold up the spring roll to secure the final corner.
Deep fry in plenty of oil over medium heat until golden brown.
Remove and place on paper towel to remove excess oil.
Final Thoughts
Don’t worry how they look! They will still taste good!
Wrapping is the hardest part. I do not have pictures, but you may be able to find some online in case these directions are confusing!
This recipe was submitted by Megan, a fellow volunteer here in Thailand. She is a vegetarian and has a very different outlook on food here in Thailand. While Thai food transfers easily into the vegetarian world (lots of veggies, tofu, etc), there are some dishes she cannot eat and others she loves that some of us have never actually tried. Let’s face it, when you’re a meat eater, there are so many Thai dishes you can try … you often don’t get to the vegetable ones!
Anyway, she has been talking for weeks about this amazing dish her Thai family makes. She says it is by far the best dish she has had in Thailand. She hasn’t been able to get an official recipe from her family because, well, that requires extensive Thai and she (and most volunteers) just don’t have it. She has also attempted to watch the cooking process, but I guess her family is very secretive. It just sort of ends up on the table!
So, she had done a little research and found a recipe that she believes is similar to what her family makes. She says that the one her family makes has much more pumpkin and much less “soup” and it is served with rice rather than in a bowl. However, she says the ingredients looks the same and the process seems accurate. So, I present this to you as a guest submission and will hopefully be able to attempt this recipe in the future!
The recipe was found at Thai Food and Travel … check the site out for pictures as well as more interesting recipes and articles!
Pumpkin Coconut Soup
Servings: 8
Difficulty: intermediate
Ingredients:
About 1 1/2 lb. well-ripened kabocha squash, or pumpkin
Juice of one lime
1/3 lb. fresh shrimp (can be omitted)
2-4 fresh red jalapeno of fresno peppers, chopped
2-3 shallots, chopped
1 Tbs. gkabpi shrimp paste (no idea what gkabpi is, just go for normal shrimp paste)
1 1/2 cups water
4 cups, or 2 cans, coconut milk
1-2 Tbs. fish sauce, or to taste (soy sauce as substitute)
1 Tbs. or more palm sugar (or brown or white!)
1 cup fresh lemon basil or lemon mint (substitute with fresh Thai sweet basil in whole leaves)
Garnish: short sprigs of lemon basil, lemon mint or Thai basil
Method:
Cut the kabocha squash or pumpkin in half, scoop out the seeds and strings, peel and discard the tough outer skin. Cut into 1 to 1 1/2-inch cubes (should yield about 5 to 6 cups). Sprinkle and coat the pieces with lime juice and set aside.
Shell the shrimp and place in a blender or food processor with the chopped peppers, shallots, shrimp paste and 1/2 cup of water. Puree into a smooth, well-blended mixture.
Reserve two cups of the thickest cream from the top of the 2 cans of coconut milk. Set aside. Pour the remaining lighter milk, along with the remaining 1 cup of water into a medium-size soup pot. Stir in the pureed shrimp mixture and mix well to dissolve the paste in the liquid, smoothing out any lumps.
Bring the soup mixture to a boil over medium heat, stirring to a smooth consistency.
Add the kabocha squash or pumpkin chunks. Return to a boil and simmer over low to medium heat until the squash is soft and tender (20 to 30 minutes, depending on the squash). Note: Do not be concerned at this point with the appearance of the soup as it will change considerably with the addition of the coconut cream.
Add the reserved coconut cream and bring to a boil over medium heat.
Season with fish sauce to the desired saltiness. Note: The squash should impart a lovely golden color to the soup. If it is not sufficiently ripe to sweeten the soup, add palm sugar to sweeten to your liking.
Simmer a couple of minutes to allow the flavors to blend. Stir in the lemon basil or lemon mint (or Thai basil) and when they have wilted, turn off heat.
Serve warm, garnishing the top of each bowl with a sprig of lemon basil, lemon mint or Thai basil.
Final Thoughts
Adding the coconut cream near the end of cooking ensures a smoother, creamier soup and minimizes the likelihood of the cream curdling. Coconut cream, particularly from canned coconut milk, will tend to curdle if boiled with water for too long or over too high a heat.
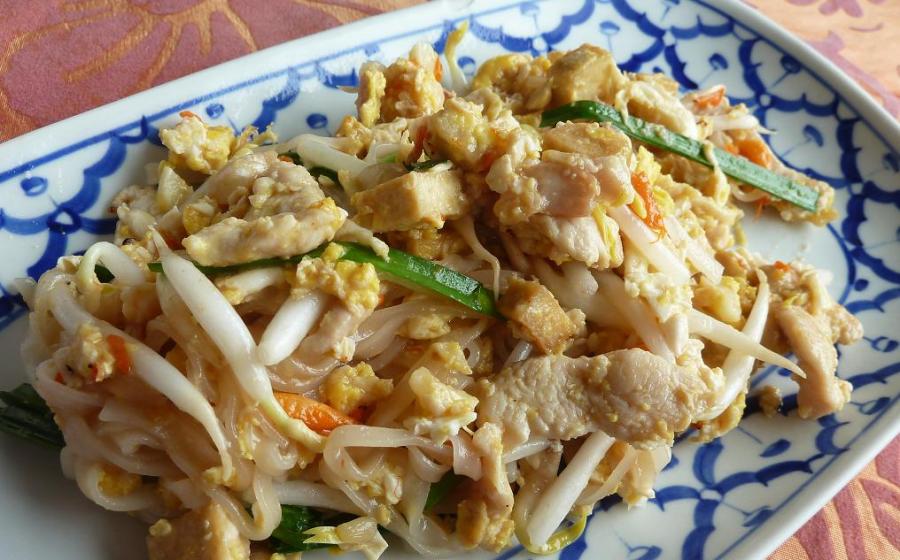
It seems to me that back in the states, Pad Thai is by far the most popular dish in Thai cuisine. Every time I ask my friends what they like the most, the answer is almost always Pad Thai. I’m not saying it isn’t popular in Thailand as well, but for whatever reason it seems to have skyrocketed to the top as Americans’ “favorite Thai dish”.
Who wouldn’t love such a concoction? Noodles, eggs, meat/tofu, peanuts, bean sprouts, lime? It’s awesome! I will say though that the Pad Thai available in the states is not nearly as good as the Pad Thai available in Thailand … at least in many restaurants … why? Because of the sauce. So many restaurants in the states cover the Pad Thai in a thick peanuty sauce that takes over the taste of the entire dish. My best friend Cory can attest to this … Pad Thai in Thailand = much better!
So, here I offer you a traditional recipe for Pad Thai. This recipe is a perfect blend of flavors, none too overwhelming, that will satisfy everyone’s Pad Thai craving. I’m not promising this is better than all Pad Thai you’ve had in the states, but let me tell you, it’s still pretty fantastic. Enjoy!
Phad Thai Jay - Vegetarian Phad Thai
Servings: 2-3
Difficulty: hard
Ingredients
Pad Thai Gai (made with chicken)
1/3 cup plain vegetable oil
4 oz 2-3 millimeter wide dried rice noodles, prepared
2/3 cup Phad Thai sauce
1 TBSP shrimp paste in oil, optional
2 cloves garlic, peeled and finely chopped
1 medium shallot, peeled and finely chopped
¾ cup firm tofu, optional
2 large eggs, cracked into a bowl
6-7 stalks Chinese chives
2 cups bean sprouts
Garnish
Sugar, dried red pepper flakes, fish sauce, lime, chopped peanuts, Chinese chives
Method
Cut the chive blades into 1-inch pieces; reserve bottom parts for garnish. Mix 1-inch pieces with bean sprouts and set aside.
Set a flat pan or wok over medium-high heat, add half of vegetable oil.
Once oil is hot, add noodles followed by sauce (and shrimp oil is using); stir constantly keeping the noodles moving at all times.
After 30-40 seconds or once noodles are slightly softened, push them to one side of the pan and add the remaining vegetable oil.
Add garlic, shallots, and tofu (if using). Stir on one side of the pan but still move noodles around on other side so they don’t burn.
Once garlic and shallots have browned slightly mix in with the noodles and push mixture back to one side of the pan.
Pour broken eggs onto empty side of the dish; scramble with spatula and then let cook undisturbed on one side of the pan before flipping and breaking them into smaller pieces.
Once eggs are done your noodles should be soft and chewy, sauce has been absorbed into noodles, and little bits of shallots and garlic are crispy.
Take off the heat and mix all together. Add two handfuls of chive-bean sprout mixture and give a gentle stir.
Serve topped with 2-3 TBSP chopped peanuts, a wedge of lime, and chive stalks. Season individually to taste with fish sauce, sugar, and dried red pepper flakes.
Notes:
This dish cooks very fast! Make sure that you watch the heat, add things immediate, and don’t overcook. This is one of the more stressful dishes to make (at least for me!) and definitely takes practice!
Cooking the egg is the hardest part! You want to make sure the excess water is out or it will end up a goopy mess. Let the egg fry up. You can break it apart and sort of scramble it in the pan as well. Any method works.
I chose this recipe because of the smell. The first time I ordered this in a restaurant, the aroma that came from the kitchen was incredible! It was truly mouthwatering … and the taste turned out to be pretty fantastic too! So, I decided my first “eat with rice” dish would be one that will make your kitchen smell great and your family (or guests) think “Yum, what is that amazing thing you are cooking?!”
To prep for making this dish I had to hit up the local Saturday morning market. For the last recipe, I was able to get away with going to the local Tesco, but for this one I actually had to brave the local market to get some of the ingredients as fresh as possible. It actually turned out to be an awesome experience. Not only were all of the ingredients super cheap (I purchased one ingredient for a single baht!) but they also had absolutely everything I could possibly need for this recipe and more! Remember the Kaffir lime leaves I was struggling to find? They had them in abundance and they happened to be the ingredient I purchased for a single baht. They also had handmade chili paste, dried chillies of all colors and sizes, fresh vegetables galore, and every cut of meat a chef could ask for. I purchased everything I needed and then some, and got some great ideas for future recipes.
Once back in the kitchen and cooking, this recipe turned out to be extremely simple as well. I was a bit worried since the recipe called for adding oils, then meats, then sauces, then veggies, then more sauces. It seemed a bit complicated. However, prepping all the ingredients beforehand made for a very quick cook and ultimately a very tasty dish!
My only slight mishap? I put my new wok on the gas burner before adding any oil. The metal heats up extremely quickly and the inside of my wok started to brown up almost instantly. I had to pull it off the heat and let it cool, then add the oil, and start again. Note to self for next time, really watch your heat!!!
So, that being said, here is your next recipe! Enjoy!
Garlic: Garlic in Thailand is much smaller than in the states! If you are using normal garlic from a typical grocery store, use 2-3 cloves. If you bought small cloves from an Asian market, go for 5-6 cloves.
Mushrooms: You can use any type of mushroom you want with this recipe! I’m using what are called elephant ear mushrooms because, well, they look like elephant ears. But honestly, use anything.
Chinese celery: Supposedly it’s available in most Asian markets. All I could find at the store was regular celery so I’m using that. You can, too!
Soy sauce: I don’t have it. I’ll be adding more fish sauce and sugar to make up for it.
Method
Preparations As usual, prep is so important with Thai cooking because of how fast you move from step to step. Make sure all of your ingredients are ready before you start!
A tip: Cooking goes quickly so having your ingredients ready is key. Separate the ingredients into groups so you know what to add when!
Plate One: These are your flavor starters. They are first into your pan and they get the flavor palate moving!
Plate Two: Meat of choice! This goes in toward the beginning so there is time to cook!
Plate Three: This first set of vegetables need a bit of time to cook and make for a more hearty meal.
Plate Four: This second set of vegetables don’t need much time to cook. They are added toward the end simply to heat them up and mix them in with the dish.
Seasonings/Sauces: You will be adding these with each of the different plates. Measure these out ahead of time if you don’t know the ingredients and amounts well enough to quickly measure during cooking.
How to prep the ingredients:
Meat: Cut pieces that are thin. Cubed pieces may not cook thoroughly.
Garlic: Cut off ends; remove outside layer (if you want), chop.
Ginger: Feel free to use a cheese grater/shredder or purchase pre-shredded from the store.
Onion: Quarter and separate the layers.
Mushrooms, celery, baby corn: Chop into smaller pieces. Remember, thinner pieces cook better.
Chili peppers: Bruise using the flat side of your knife. Push down on the chillies until they pop. The more you bruise, the spicier the dish will be!
Alright, are we ready to cook? Here we go!
1. Pour oil into a hot pan, then add garlic and chillies and cook until aromatic.
Note: These ingredients will get very aromatic! The chillies might make you cough and burn your eyes. That’s what’s supposed to happen! I recommend opening a window
2. Add pork (or whatever meat you choose), fish sauce, and soy sauce. Allow to cook thoroughly, stirring frequently.
Note: If the pan begins to get dry, do not add more oil! Add a little bit of water. The water will eventually evaporate away but the oil will stick around and ruin the recipe.
3. Add onion, mushrooms, and baby corn. Cook about two minutes.
Note: Pay attention to the onions. They are the vegetable that takes the longest to cook. When those start to look slightly translucent, move on to the next step. Do not wait until they are completely translucent and they will continue to cook as you go.
4. Add oyster sauce and mix well. Add Chinese celery and ginger, mix thoroughly for about one minute. Remove from heat.
Notes:
Too much oyster sauce will make your dish very salty! I would start by adding half the amount asked for, then taste. If you feel you need more, keep adding.
Cooking the ginger too long will also make the dish more salty. Only keep on long enough to heat the ginger and celery up!
Final Thoughts
In my opinion, the amounts of the sauces for this recipe are a bit off. I think the amounts they provide make for a very salty dish. Here are my thoughts on amounts:
Fish sauce: Keep the same. This seems about right.
Oyster Sauce: Start with half, then add a bit more if needed. This is where it seems to get a bit salty.
Soy Sauce: I didn’t use it. I also didn’t substitute for it. I think had I used it, the salt factor would have been through the roof. The choice on this one is yours though!
Also, I actually liked this with the regular celery, but I think I like it more with Chinese celery. If you can get your hands on it, it makes the recipe more authentic.
If you try this recipe, be sure to let me know how it goes! Send pictures, stories, questions, etc. I’ll be sure to post them on the site!
I debated what my first recipe should be on this little cooking adventure of mine. I went back and forth between whether I should make one of the recipes I made up in Chiang Mai (because I already knew what I was doing) or whether I should try something new to possibly give you guys a crazy story of mishap and a burned down kitchen. In the end, I decided to choose a recipe that I truly love … something that I would love to eat and that I knew every one of you would enjoy as well.
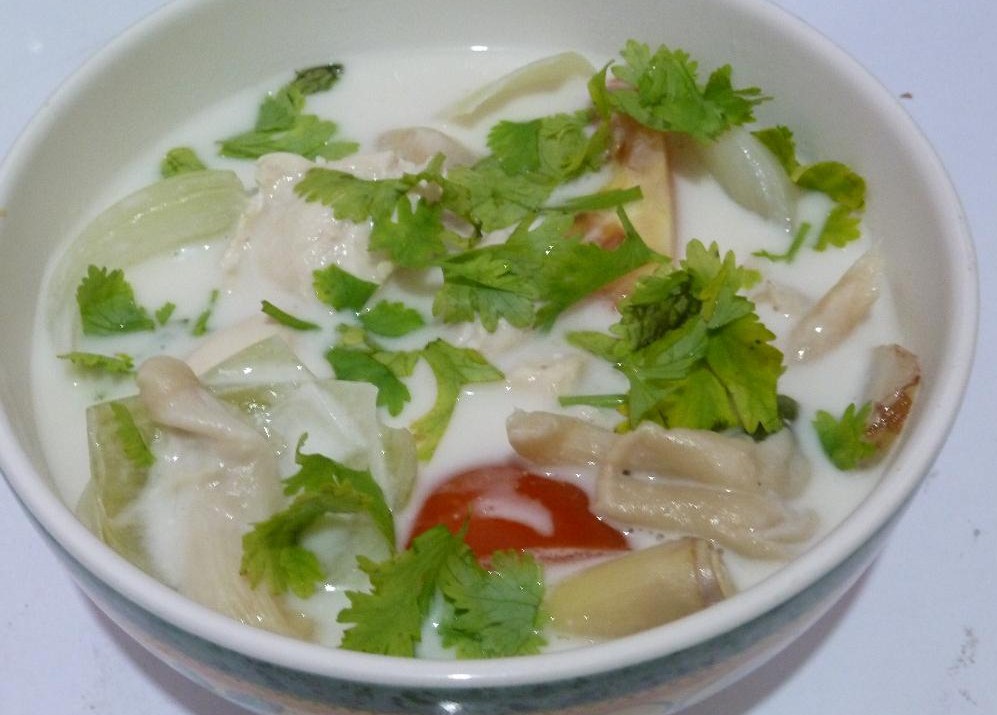
Chicken with Coconut Soup is the very first recipe I made up at the Chiang Mai cooking class and it was by far my favorite thing I ate that day. It is a savory combination of classic vegetables with a few unique Thai tastes to give it a unique flair. Every bite of this soup hits just the right spot and leaves you wanting more. My experience cooking this dish for the first time wasn’t exactly … smooth.
So my adventure started at the supermarket. I was going to hit up the Saturday morning market and do this recipe traditional Thai style (shopping and all), but in all honesty, I didn’t want to wait until Saturday to cook! So, I went to the local Tesco, the Thai equivalent of Walmart in the states. They have everything so I knew I could hit the ground running. I picked up all my meats and veggies, some of the seasonings, and was ready to go.
I will say though, Kaffir lime leaves seem to be just as difficult to find here in Thailand as they are in the states! You can’t find much of them in the states because the limes themselves are not USDA approved for growing. They are abundant here in Thailand (they are a key ingredient in any curry) but Tesco didn’t have them! Well, they did, but they were in a package of all ingredients to make a basic Thai curry. I had to buy the whole set, which means I’ll be making curry sometime next week (not such a bad thing). I need to visit the local market though to see if these leaves are more conveniently available somewhere.
Alright, now it’s on to cooking. I am somewhat happy to report that this cooking experience went off without a hitch! Well, except for cutting up the chillies and then rubbing my cheek. I still have a burning sensation just below my eye and it’s about an hour later. Be careful people; chilies are serious business.
So, since there aren’t any crazy experiences to throw in, I’ll just get straight to the recipe. Read on and then give it a try! Can’t wait to see how this turns out for all of you.
A nice warm bowl of Tom Kha is great on a cold day!
50g (about 1 breast) chicken, sliced into bite-sized pieces
3-4 pieces sliced lemon grass (one stalk)
3-4 pieces thinly sliced galangal
2 Kaffir lime leaves, halved
1-3 fresh chillies, bruised
1 small/medium onion, quartered
1 medium tomato, quartered
1 oz. angle mushrooms, torn into pieces (or any mushroom you like)
1/2 TBSP coriander, chopped
1.5 tsp sugar
1 – 1.5 TBSP lemon/lime juice (I use lime)
1 TBSP fish sauce
1.5 cups coconut milk
1 tsp chili paste (secret weapon – don’t forget it!)
Method
Preparation
Prep is key to recipes like this since the cooking part actually moves pretty quickly. Have all of your ingredients prepped prior to starting. It’ll make your life so much easier!
A tip: Split your ingredients into groups so you don’t accidentally add something at the wrong time. Not that big of a deal, but it’ll make for a smooth process if you have things separated.
Plate One: These are all of your flavor enhancers. These are not actually intended for eating. You can if you want to, but I wouldn’t recommend it. Yuck! These will be your first set of ingredients to add.
Lemongrass, Kaffir leaves, Chillies, and Galangal
Plate Two: These are the ingredients you add second. They need a bit of time to cook. They also will soak up all the flavors from the pot so the longer they are in, the better.
Chicken, Onions, and Mushrooms
Plate Three: These are your final touches. The tomatoes will be the last ingredient you add while cooking. Cooking them too long makes them mushy. The coriander is added at the very end once in the bowl.
Tomatoes and Coriander
Seasonings: These are added at the last minute to create the final taste you want!
Sugar, Fish Sauce, Lemon/Lime Juice; Missing: Chili Paste
How to prep the ingredients:
Lemongrass: chop off the top and throw away; chop remaining piece in half, double up, chop in half again. If it still seems too big, cut a little bit smaller.
Chillies: chop off the top and throw away. Bruise the chillies using the flat side of the knife. Push down on the chillies until they pop a little bit. The more you bruise, the more spicy (because the seeds will start to come out).
Kaffir lime leaves: fold in half, pull out the center stem, throw stems away. This releases the flavors from the leaves when cooking.
Galangal: slice off two or so pieces a centimeter or two in width. If your piece of galangal is large, cut the circles in half.
Mushrooms: Use whatever type of mushroom you like, but break up into fairly large but bite-sized pieces.
Alright, here we go!
1. Add coconut milk, lemongrass, galangal, kaffir lime leaves, and chilies to a pot and bring to a boil. Continue to simmer until aromatic.
Notes: You want to be able to smell the lemongrass, kaffir and chilies. Don’t be afraid to allow this to simmer for a few minutes. The longer you wait, the better the flavor. Just don’t keep the heat too high or the coconut milk will overcook.
2. Add chicken, mushrooms, and onions. Allow to cook thoroughly.
Notes: The onions are the part I like to keep an eye on during this stage. You don’t want the onions to be crispy at the end so give them time to start peeling apart and softening up. This might take a few minutes. Also be sure the chicken cooks thoroughly.
3. Add tomatoes and allow to cook for about 1-2 minutes.
4. Add fish sauce, lemon/lime juice, and sugar to taste. Add chili paste to taste.
Notes: Don’t be shy with the fish sauce. Yes, it smells terrible and tastes awful on it’s own (in my opinion) but when used in cooking it adds a great salty flavor. Don’t skip this! Also, it’s all about the chili paste! I didn’t have it when I cooked this time, but adding it at the very end will give it a nice hot/sweet combination. It’s what makes this entire soup for me!
5. Turn off heat, place in bowl, and sprinkle with coriander. Serve.
Final Thoughts
My final product was pretty good but there are a few things that made it less than perfect for me. Here’s the list:
I didn’t let the soup simmer long enough on the first step. I was anxious and hungry and the flavors didn’t come out enough. Next time, another couple minutes.
I didn’t have chili paste! Honestly, this is the secret weapon of this recipe. It’s still really great without it, but a touch of paste at the end can go a long way. Never again without it!
Well, there you go! Give this recipe a shot. You won’t be disappointed! And send me pics, stories, questions, etc. I’m starting a submission page of people’s attempts at these recipes … don’t be shy!
This dessert is to die for! Served hot, this soup like concoction warms the belly, has the perfect amount of sweetness, and is the perfect end to a meal.
Gluai Buat Shee - Bananas in Sweet Coconut Milk
Servings: 2
Difficulty: easy!
Bananas in Sweet Coconut Milk
5-6 barely ripe bananas
2 cups coconut milk
1 cup coconut cream
¾ cup sugar
1 tsp salt
Method
Peel the bananas and slice into ½ – 1 inch rounds. Set aside.
Using low to medium heat, bring coconut milk to a boil in a pot.
Add salt and stir. Add bananas and simmer until bananas are soft but not mushy, about 3 to 5 minutes.
Add sugar and stir to dissolve.
Let the pot simmer gently until bananas are slightly softer, another 3 to 5 minutes.
Remove from heat and add coconut cream on top.
Let cool to warm before serving.
Notes:
Where to buy coconut cream? Any Asian market should have cans of coconut milk and coconut cream. Make sure you buy the correct one. If you can’t find it, buy a can of coconut milk and do not shake it before opening. There should be a layer of thick white cream on the top and the milk separated on the bottom. You can use the top portion as the cream as well. There is also powdered coconut cream available at many Asian markets as well.
Tip: Sprinkle the top of sesame seeds to add a little crunch.
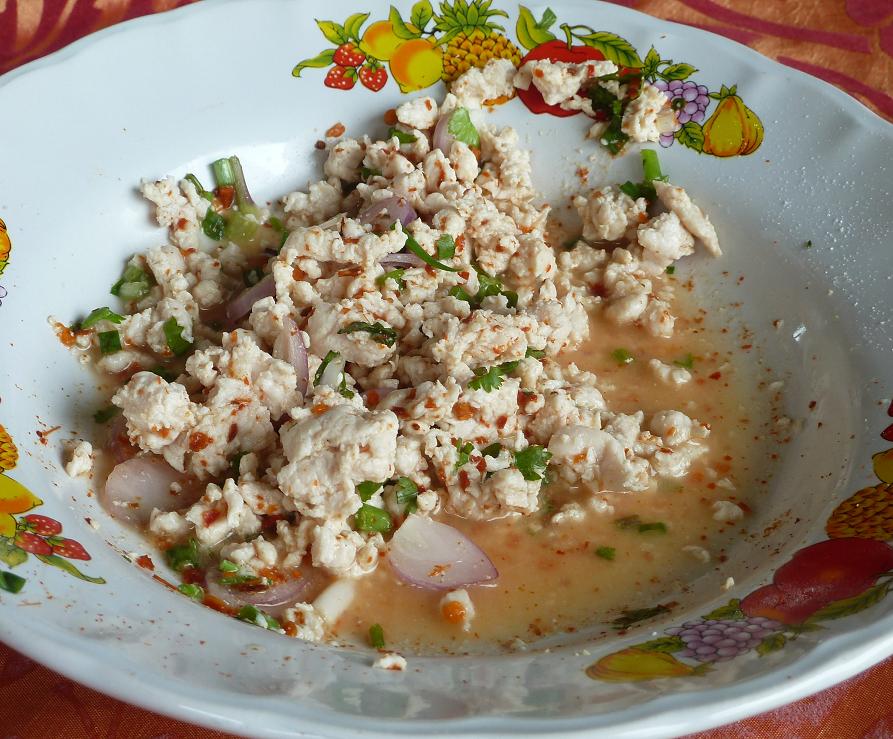
This dish originated in Isaan, the Northeastern region of Thailand. There are many ways to spice up this recipe and it has become one of my all time favorites here in Thailand. I like to eat it with sticky rice–another one of my favorites!
Laab Gai - Savory Minced Chicken Salad
Servings: 2
Difficulty: intermediate
Ingredients
Savory Minced Chicken Salad
1 lb chicken, ground
½ cup water, if necessary
2 large shallots, peeled and finely sliced lengthwise
1 TBSP toasted rice powder
Fish sauce, to taste
Lime juice, to taste
Ground dried red pepper, to taste
½ cup cilantro leaves
1/3 cup mint leaves
Method
In a skillet, sauté chicken until cooked through. Do not brown the chicken. There should be some juice in the pan. If not, add up to a ½ cup of water to keep moist.
Remove chicken and immediately add shallots. Toss thoroughly to wilt shallots.
Add 1 TBSP fish sauce and 1 TBSP lime juice. Toss everything together and taste. Add additional fish sauce and lime juice to taste (2 TBSP fish sauce and 4 TBSP lime juice is average final amounts).
Add toasted rice powder, toss. Add 1 tsp chili powder and toss. Taste and add additional chili powder to preference.
Add mint leaves and cilantro and toss thoroughly. Serve.
I thought I’d start you all off with a few simple recipes that you can try … and can’t really mess up! This one is one of my favorites for any meal, especially breakfast.
Note: As of February 6th, 2014 I have updated this recipe. The original recipe was the one I received in our cooking class up in Chiang Mai. While delicious, Cory and I have made this dish over and over … and over again … and found a new recipe that we think is far closer to the flavoring we like. Hopefully you enjoy as well!
1 lb ground chicken (or pork, tofu, or any other protein)
8-9 cloves garlic, peeled
7-9 Thai chilies (depending on your preferred spice level)
1 shallot, peeled and cut in half
2 TBSP vegetable oil
1-1.5 TBSP fish sauce (don’t be stingy on this!)
1 TBSP soy sauce
1 TBSP Golden Mountain sauce (if unavailable, add an additional TBSP of soy sauce)
1 TBSP oyster sauce
1 cup holy basil leaves (most likely you will not be able to find these and can substitute Thai basil)
Method:
Combine garlic, chilies, and shallot in a mini-processor and blend until ingredients form a paste.
Add vegetable oil to a hot pan; add paste from processor. Fry until fragrant, about 3-5 minutes.
Add chicken (or other protein) and stir until mostly cooked. Add remaining ingredients (except basil) and continue frying until cooked thoroughly. Taste test during this process and add additional seasonings as desired.
Once cooked, add basil and mix lightly until basil is just wilted. Remove from heat.
Tip: Fry up an egg on the side and serve it with rice. It’s awesome!